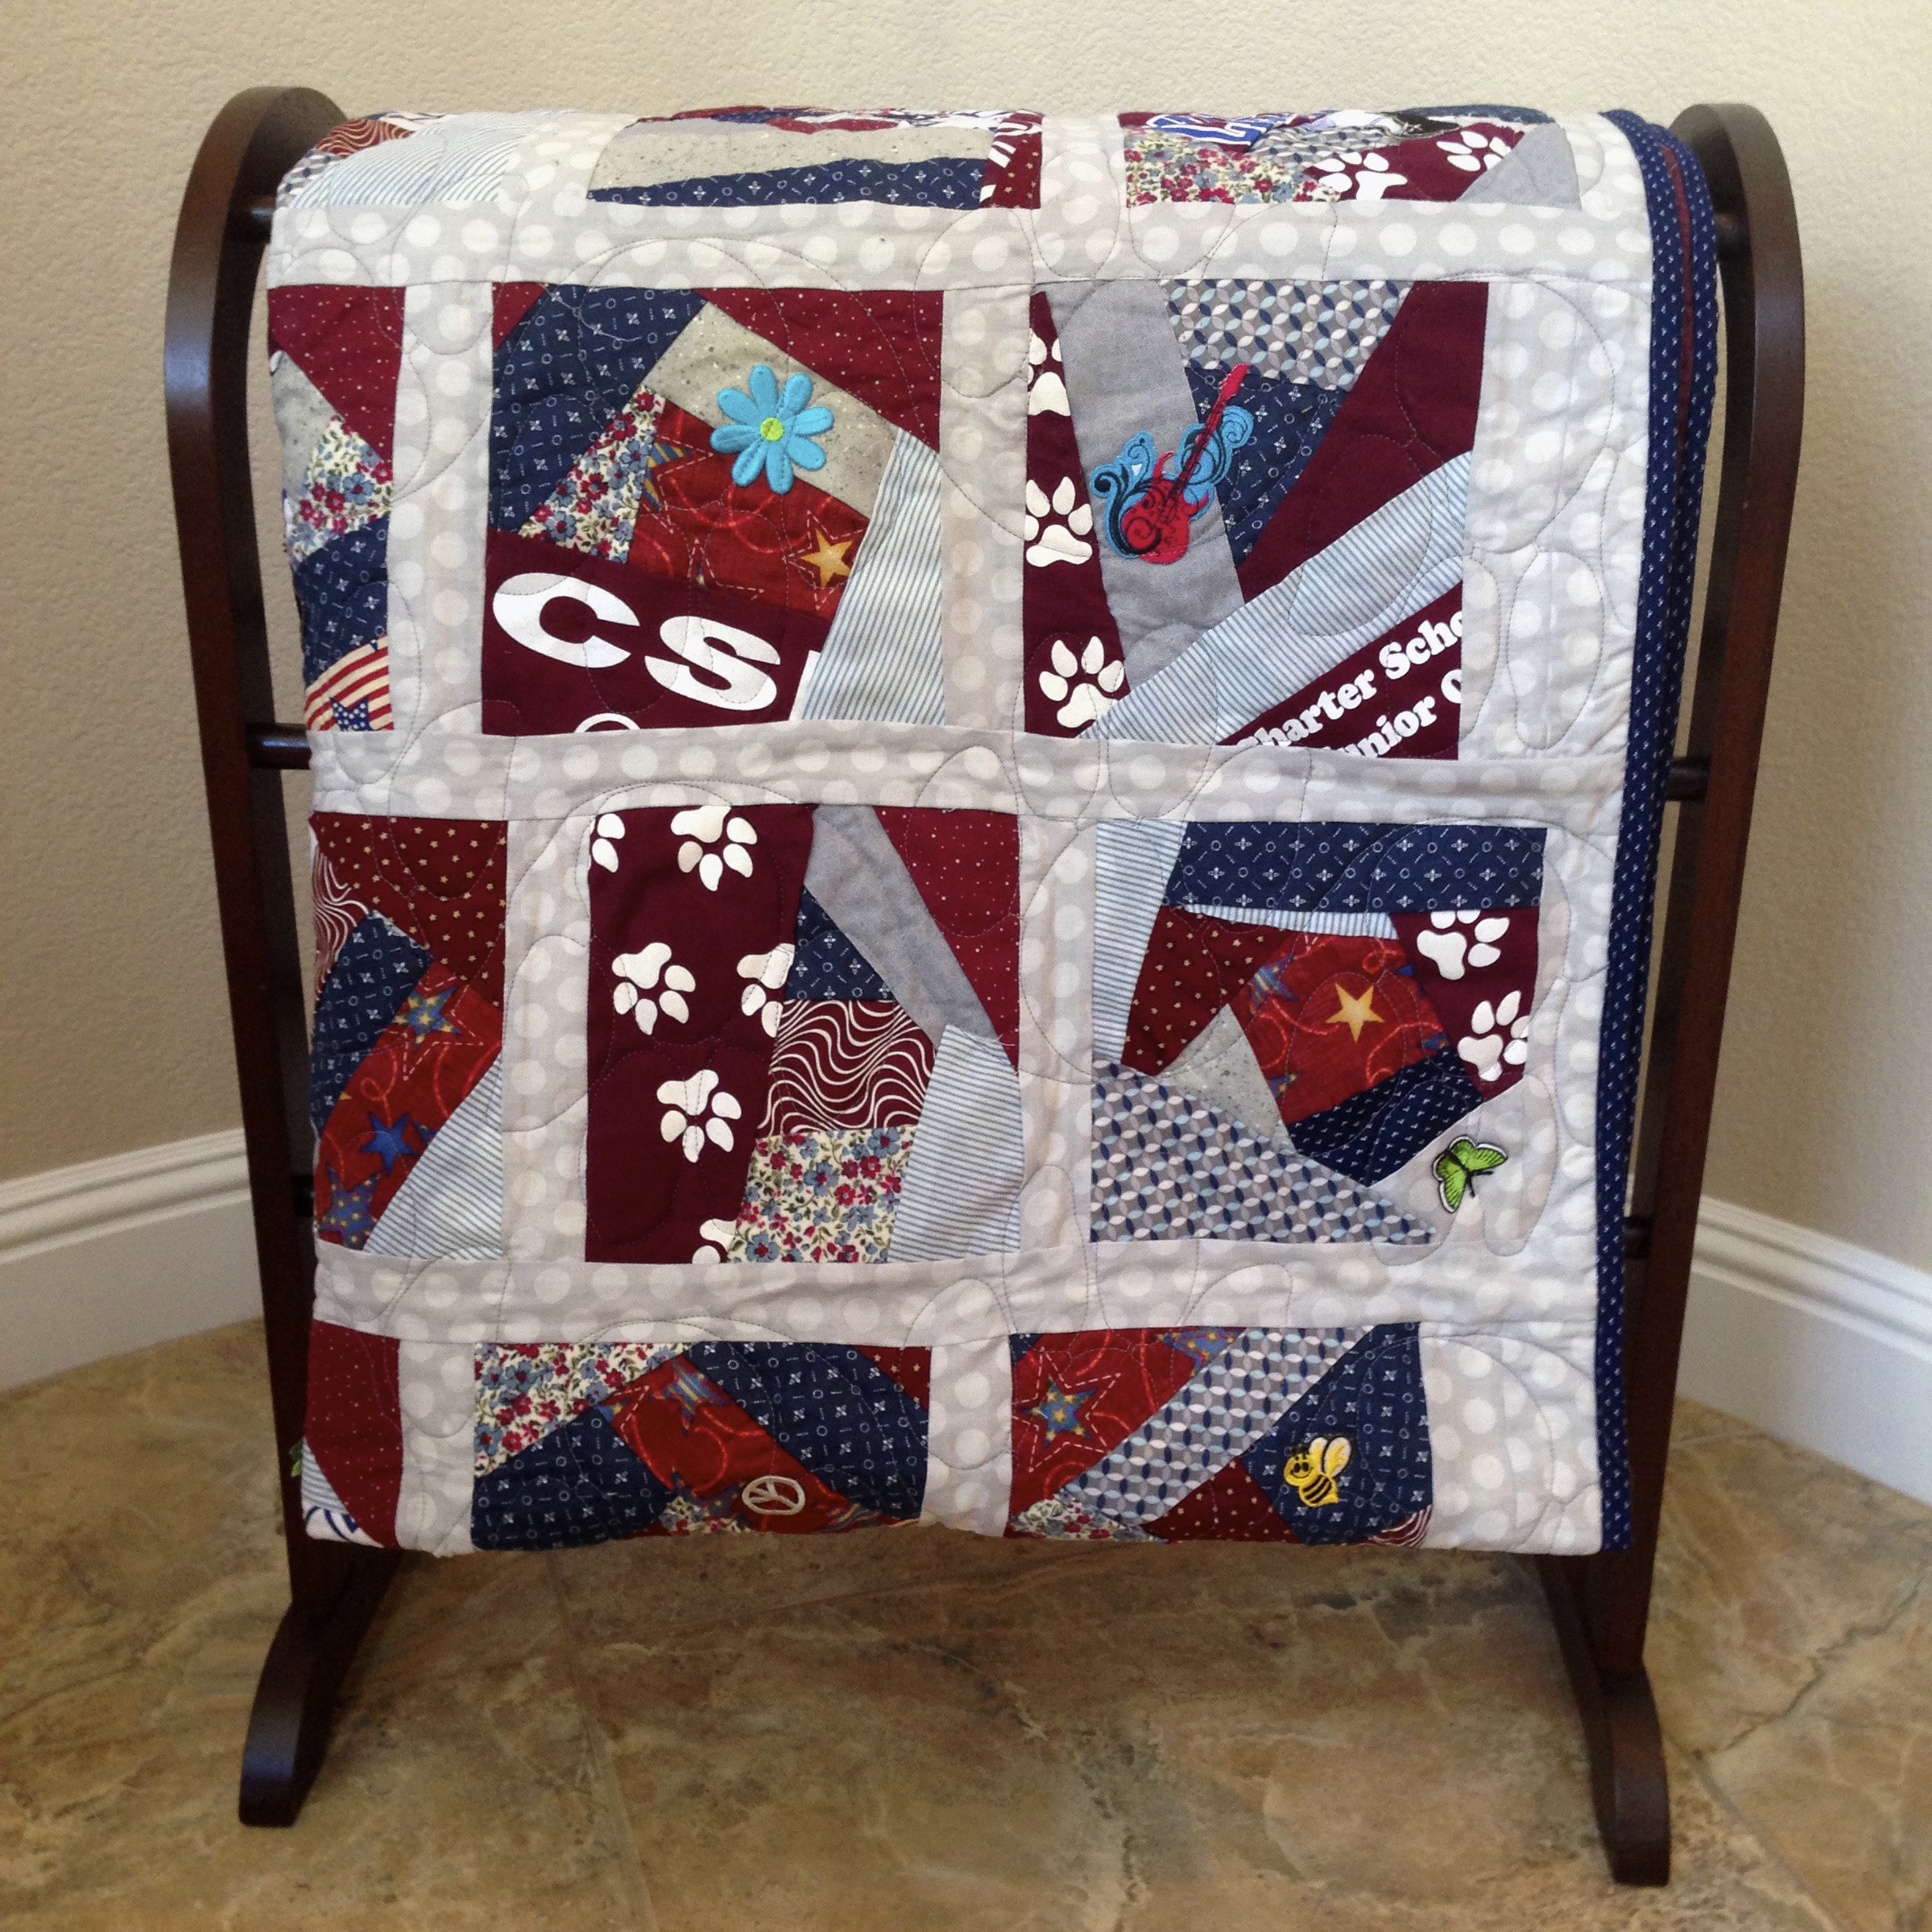
Isn’t this quilt just simply stunning? I think so! Ok, so maybe I am a bit partial, but I simply love the way this class project came together.
Like many schools in America, our school holds an annual Dinner-Auction. This is a huge fundraiser for the school. It is a night out for mom and dad to mingle with their friends, enjoy great food, and marvel at all the wonderful items to bid on. Each class contributes a class project, and each teacher also contributes a “Teacher Treat”. My Teacher Treat is an afternoon playing Lazer Tag. Oh, the fun we have.
It has been many years since I have sewn a quilt with my students, and for whatever crazy reason, I was up for the challenge this year. I say challenge only because our Dinner-Auction comes so quickly after the beginning of the school year. We have just finished our sixth week of school and one of those weeks (last week) was spent away at science camp. So, completing this quilt has been a time challenge for sure.
Over a two week time period the students learned how to stitch, and stitch they did! We worked through the initial steps together. Choosing a center piece of material and basting it onto our muslin squares. Once they had the anchor material in place, they choose another scrap of material and stitched some more – tied a knot, threaded a needle, and stitched some more. Repeat. Repeat. And Repeat (6 − 9 times).
The wonderful thing about sewing a crazy quilt is that you simply cannot go wrong. You start in the center and work your way off the square muslin.
When you have the square covered, you trim the edges. flipping it over to the back side, you simply use the muslin as your cutting guide. The students also personalized their squares with an iron-on patch of their choice. We also used some old school t-shirts to give it a school feel. In fact the colors chosen are our school colors: burgundy, navy , and grey.
At this point the quilt front went to a local quilt shop for the quilt lady to add the batting and bind the back together on the quilt machine. I absolutely love the cheetah paw prints that she used for the quilting pattern. This combined with the burgundy polka-dotted material gives it a cheetah feel! Our school mascot.
And now the quilt is all ready for our school auction! I could not have done this without the help of some amazing parent volunteers, and the kids’ enthusiasm, which kept us all going.
How to Sew a Crazy Quilt
There are a lot of crazy quilt square patterns out there, and I did give the kids one to loosely kind of follow in a quasi sort of way. They great thing about sewing a crazy quilt is that you really cannot go wrong.I cut out the muslin squares that the students used as the base. The squares were 7.5 inches by 7.5 inches. This gave the squares a 1/4-inch seam allowance. I cut the squares because it is important to have them all even and uniform. Well I did my best, but they were far from perfect.
If you look at the finished quilt, you will see that the squares do not line up! We simply added extra material at the end of rows if it was needed. The overall look is great – it is crazy.The kids chose their first piece of material and pinned it to the center (or slightly off center) and stitched this one with a running stitch – a simple basting stitch. They then chose their next piece fo material and laying the second piece pattern-side down they lined up one edge to cross over a corner or alongside an edge of the first piece. With a looping stitch – back stitching, or a very close running stitch they sewed down one edge of the face-down material. Then once the thread was knotted and tied, they flipped the material over and ironed it flat.
Continuing in this manner, face down, stitch one side, flip and iron, they continued working their way around and out until they covered the whole square. It was important to always start and finish on the back so the kids would knot each piece onto the muslin. The material extended out over the limits of the square, but their stitching did not.
Flipping the patch over, and using the original muslin square as our guide, we trimmed the excess material off. Some students chose to iron on a patch to personalize their square. Voila – a crazy quilt square!
I loved seeing the kids pride grow as they saw their individual pieces come together! This was a wonderful classroom project for our school dinner-auction.
Interested in ordering prescription remedies over the internet


Beautiful quilt! What a great way to get kids in the classroom involved in a fundraising project, usually it’s the moms and the PTA doing all the work.
This really is a beautiful quilt. One of the things I love about a crazy quilt is that there are so many great memories in them. Memories from the fabric and from putting it together. One lucky person will own this beautiful quilt.
What a great project. I love my quilts and quilting is a lost art. I wish I learned the skill when I was young.
That is WONDERFUL that the kids actually got involved in making this beautiful quilt in the classroom. Usually it’s the moms and the PTA doing the fundraising work. This is a really teaching moment for young people for sure.
Your crazy quilt is a treasure. And what skills your students learned while sharing their individual creativity.